Showing posts with label n gauge model plans. Show all posts

Wednesday 29 October 2014

4 N Gauge Model Card Farm Building Plans

I've recently created some new N Gauge buildings and four of them are now available to download on Etsy. I have made the plans even easier to create the models, with step by step instructions still included. Just simply print out the PDF documents, cut out and glue together. Here are the photos and details of the completed models I'm adding to my n gauge model railway layout.


Print and build 4 N Scale card model farm buildings including:

Stables
Pig Sties
Cow Shed/Milking Shed
Chicken Coop
Food and water trough plans are included

The plans are in full colour PDF format and can easily be printed onto A4 thin card (160 gsm recommended) or A4 paper which can then be glued to card. Once printed they can be quickly and easily made by just cutting out and gluing the tabs etc., to make the models shown in the pictures. Step by step instructions included.

There is no postage cost as a download link for all my models will be given immediately upon cleared payment.

Full refund given if you are not entirely happy with the plans. More Details & Download Here

Scale 1:148 - 1:160

Wednesday 1 May 2013

Shops N Gauge Card Model Plan


Print and build an N Scale card model of a row of shops including a chemist/pharmacy, stationers, butchers and bakers. The plans are in PDF format and can easily be printed onto A4 thin card or A4 paper  which can then be glued to card. The model can be quickly and easily made by just cutting out and gluing the tabs etc. I have included a wristwatch in one shot to give you an idea of the size when finished. Get it on Etsy or Bonanza


Sunday 7 April 2013

1950/60's Garage and Petrol Station N Scale Card Model Plan

 Print and build an N Scale 1/160 card model of a 1950/60's garage and petrol station. The model is based on the Aidensfield Garage in the 'Heartbeat' TV series set in the 60's. The plans are in PDF format and can easily be printed onto A4 thin card or A4 paper which can then be glued to card. The model can be quickly and easily made by just cutting out and gluing the tabs etc. I have included a coin in one shot to give you an idea of the size when finished.


To build this you need the following:

1. A fine sharp craft knife
2. UHU hart adhesive or similar (quick drying)
3. Metal rule

First print out the pdf file plan directly onto A4 thin card or onto A4 paper which you then stick to thin card. Then follow the instructions below. It is probably best to start with the garage so you can get used to the pressure required for cutting through the card and for scoring.

Garage

  1. First cut out the walls piece complete. Score the vertical grey lines for bending, after the whole piece is cut out. If you want the doors in the open position, cut out the door apertures. Cut out the blue wall connector. Carefully bend all the walls along the scored lines and glue the wall connector to the inside of the side wall where they join above the door aperture.
  2. Cut out the inside strengtheners and glue them inside the end walls.
  3. Cut out the front double and side double doors. Cut out the side door and main front door spacers and top fascia boards. Glue both sets of doors in position either open or closed. Use the spacers as a guide to how wide you can have the doors open. The spacers allow the tops of the doors to be covered by the fascia boards. Glue the appropriate spacers above both sets of double doors. Stick the fascia covers over the top of the spacers.
  4. Cut out the roof and then score the lines along the tabs so that they can be bent back double against the main roof. Fold and glue back the two longest sides first followed by the wall end tabs.
  5. Once dry glue the roof to the main walls.
  6. Cut out the chimney stack, score and bend to shape, then glue together and then in place on the roof. Stick the small chimney capping stone to the top. On this instruction sheet you will find a strip of brown. Cut this out and roll between finger and thumb to make the chimney pot. Once rolled nicely, add a touch of glue to the end to fasten. Once dried glue this in place.
  7. Cut out and build the petrol pump, stand and oil tank if required. The two small squares either side of the pump are swinging arms once folded and glued to the top of the pump. I added some black cotton from inside the swinging arms to the sides of the pump, for the petrol pump pipes.
  8. Finally, when dry you can touch up any white areas carefully with a small brush and some water colour paint or some felt tip pens.
Get the model plans for this in my Etsy shop

Tiled Cottage, Garage and Garden

This new N Gauge cottage, garage and garden is in a easy to make print and build format.

To build this you need the following:

1. A fine sharp craft knife
2. UHU hart adhesive or similar (quick drying)
3. Metal rule

First print out the pdf file plan directly onto A4 thin card or onto A4 paper which you then stick to thin card. Then follow the instructions below. It is probably best to start with the garage so you can get used to the pressure required for cutting through the card and for scoring.

Garage

  1. Using the craft knife carefully cut out the garage walls piece. Score the vertical grey lines for bending after the whole piece is cut out. Carefully bend all the walls along the scored lines and glue the tab to the inside of the end wall.
  2. Cut out the inside strengtheners and glue them inside the end walls.
  3. Cut out the roof and then score the lines along the tabs so that they can be bent back double against the main roof. Fold and glue back the two longest sides first followed by the wall end tabs.
  4. Once dry glue the roof to the main walls.

Cottage

  1. First cut out the walls piece complete. Score the vertical grey lines for bending, after the whole piece is cut out. Cut out the end wall strengthener. Carefully bend all the walls along the scored lines and glue the end wall strengthener to the inside of the end wall where they join.
  2. Cut out the inside strengtheners and glue them inside the end walls.
  3. Cut out the roof and then score the lines along the tabs so that they can be bent back double against the main roof. Fold and glue back the two longest sides first followed by the wall end tabs.
  4. Once dry glue the roof to the main walls.
  5. Cut out the chimney after scoring the vertical lines. Bend to shape and glue. Stick this across the join on the end wall and between the cut out in the roof.
  6. Stick the small chimney capping stone to the top. On this instruction sheet you will find a strip of brown. Cut this out and roll between finger and thumb to make the chimney pots. Once rolled nicely, add a touch of glue to the end to fasten. Once dried, cut this in two where marked for the chimney pots. Glue these in place.
  7. Cut and score the porch if required. Glue the white strengthener inside and glue the unit to the front wall. Cut out, bend and add the roof.
  8. Finally, when dry you can touch up any white areas carefully with a small brush and some water colour paint or some felt tip pens.
Get the model plans for this in my Etsy shop

Suffolk Pink Thatched Cottage, Garage and Garden

This latest N Gauge plan for a Suffolk pink thatched cottage, garage and garden is in a simple print and build format.

To build this you need the following:

1. A fine sharp craft knife
2. UHU hart adhesive or similar (quick drying)
3. Metal rule

First print out the pdf file plan directly onto A4 thin card or onto A4 paper which you then stick to thin card. Then follow the instructions below. It is probably best to start with the garage so you can get used to the pressure required for cutting through the card and for scoring.

Garage

  1. Using the craft knife carefully cut out the garage walls piece. Score the vertical grey lines for bending after the whole piece is cut out. Carefully bend all the walls along the scored lines and glue the tab to the inside of the end wall.
  2. Cut out the inside strengtheners and glue them inside the end walls.
  3. Cut out the roof and then score the lines along the tabs so that they can be bent back double against the main roof. Fold and glue back the two longest sides first followed by the wall end tabs.
  4. Once dry glue the roof to the main walls.

Cottage

  1. First cut out the walls piece complete. Score the vertical grey lines for bending, after the whole piece is cut out. Cut out the end wall strengthener. Carefully bend all the walls along the scored lines and glue the end wall strengthener to the inside of the end wall where they join.
  2. Cut out the tall pink strip next to the end wall strengthener and glue this across the join on the end wall, for the chimney
  3. Cut out the inside strengtheners and glue them inside the end walls.
  4. Cut out the roof and then score the lines along the tabs so that they can be bent back double against the main roof. Fold and glue back the two longest sides first followed by the wall end tabs.
  5. Once dry glue the roof to the main walls.
  6. Cut out the chimney stack, score and bend to shape, then glue together and then in place on the roof. Stick the small chimney capping stone to the top. On this instruction sheet you will find a strip of brown. Cut this out and roll between finger and thumb to make the chimney pots. Once rolled nicely, add a touch of glue to the end to fasten. Once dried, cut this in two where marked for the chimney pots. Glue these in place.
  7. Cut and score the porch if required. Glue the white strengthener inside and glue the unit to the front wall. Cut out, bend and add the roof.
  8. Finally, when dry you can touch up any white areas carefully with a small brush and some water colour paint or some felt tip pens.

Get the model plans for this in my Etsy shop

Tuesday 26 March 2013

Suffolk Pink Tiled Cottage & Garage

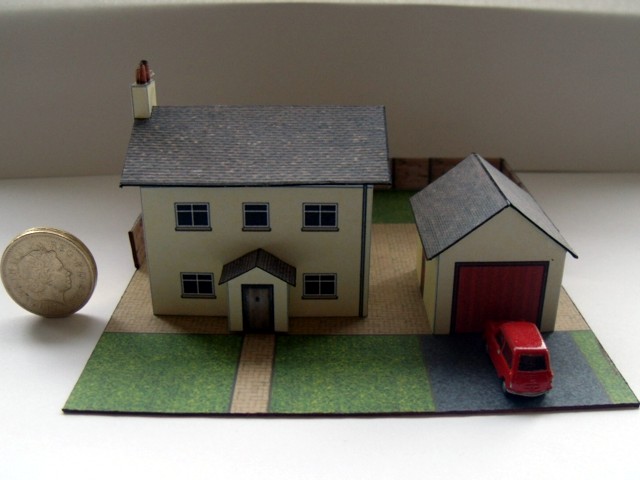
This is the Suffolk Pink Cottage and garage included in my free PC Windows program, N Gauge Model Planner. (Completely free, download below)

Download N Gauge Model Planner for Windows
Get it from CNET Download.com!

Instructions for making this are as follows:
 
Not recommended for small children without Adult supervision

To build this you need the following:

1. A fine sharp craft knife
2. UHU hart adhesive or similar (quick drying)
3. Bostik Quick Stick glue stick or similar
4. Metal rule

Firstly you need to print the plan and the texture sheet out on A4 paper. Using the glue stick, fix the wall texture to some thin card (preferable plain on one side). Lay the wall plan section over this and lightly glue on some waste areas so that the paper doesn't move while cutting. Cut along the green lines and lightly score the red ones for bending. Do this for all the parts of the plan.

After removing the windows I added some clear plastic to the inside and on top of that glued the window decoration. Then I glued the walls together using the end wall inside strengthener. Once dry I added the floor section inside for added strength. I cut the door texture out a little larger than the door space on the model and just glued this inside. The porch is an added option and built the same way.

For the chimney, fold along the scored lines carefully and fix together. Then glue this to the main building over the side with the joint running from top to bottom of the wall. I used the glue stick on the top side of the roof piece, once cut out. Then I stuck it to the back of the roof texture so that it was in the centre and also the texture was overlapping on all sides. I cut around the texture, glued and folded the overlapping pieces onto the underside of the roof. Once the roof is stuck in place on the walls I added a small central piece of roof texture to make the ridge. I finished the chimney with a small card block and rolled two pieces of paper between my fingers, plus a little glue on the end for chimney pots. I painted the pots with water colour before attaching to the chimney stack.

Garage
The garage walls and doors are already printed onto wall texture, so just cut around the outline after sticking to card. Score the three vertical lines where the walls need bending and cut out the front doors and the back window. I then glazed the back window by gluing a small piece of clear plastic inside across the back. Cut out the small green block next to the roof texture and cover with wood plank texture to form a bench. This workbench then glues underneath the back window and forms support for the two side walls. For the doors I fixed them to the main walls in the open position after covering the reverse with the same door covered paper. Make the roof the same way as for the main cottage.

For both models you can use a little water colour paint and a fine brush to cover any little errors.

Get this model plan in a pdf download at my Etsy shop


Thursday 21 March 2013

English Village Thatched Cottage

Using my N Gauge Model Planner mentioned in my previous post, this is what the thatched cottage looks like when completed.

Download N Gauge Model Planner for Windows
Get it from CNET Download.com!

To build this you need the following:
  1. A fine sharp craft knife
  2. UHU hart adhesive or similar (quick drying)
  3. Bostik Quick Stick glue stick or similar
  4. Metal rule
Firstly you need to print the plan and the texture sheet out on A4 paper. Using the glue stick, fix the wall texture to some thin card (preferable plain on one side). Lay the wall plan section over this and lightly glue on some waste areas so that the paper doesn't move while cutting. Cut along the green lines and lightly score the red ones for bending. Do this for all the parts of the plan.

After removing the windows I added some clear plastic to the inside and on top of that glued the window decoration. Then I glued the walls together using the end wall inside strengthener. Once dry I added the floor section inside for added strength. I cut the door texture out a little larger than the door space on the model and just glued this inside. The porch is an added option and built the same way.

For the chimney, fold along the scored lines carefully and fix together. Then glue this to the main building over the side with the joint running from top to bottom of the wall. I used the glue stick on the top side of the roof piece, once cut out. Then I stuck it to the back of the roof texture so that it was in the centre and also the texture was overlapping on all sides. I cut around the texture, glued and folded the overlapping pieces onto the underside of the roof. Once the roof is stuck in place on the walls I added a small central piece of roof texture to make the ridge. I finished the chimney with a small card block and rolled two pieces of paper between my fingers, plus a little glue on the end for chimney pots. I painted the pots with water colour before attaching to the chimney stack.

Get the model plans as a pdf download in my Etsy shop

Monday 18 March 2013

N Gauge Model Planner

I decided to make my own program for planning my card n gauge scratch built models. The result is my PC Windows, N Gauge Model Planner program. I have made it available for download for anyone else who is interested. It is a completely free and full program.

Download N Gauge Model Planner for Windows
Get it from CNET Download.com!
(recommended minimum screen resolution 1024x768)

It is a very easy to use application to design and plan n scale or n gauge card models. It can be used immediately without any learning curve. Simply drag lines and snap them to a grid. Measurements are shown in real size and clip art is included. Plans are easily saved with labels and notes if required. 4 model plans are also included. An English Suffolk pink tiled cottage, a thatched cottage and separate detached garages for each. Textures include walls, brickwork, tiled roof, thatched roof and more. See screen shots below.